
When it comes to small businesses and freelancers, customers tend to get away with delayed payment and sometimes even with non-payment. Whether said customers are individuals receiving your services in their residences or big companies hiring you to work on their commercial premises, delayed payment is a fact of life for many SMEs.
Customers often do not care or even understand that small businesses work with a very small margin, and hence need to have their payments cleared within the stipulated period. This is borne out by the fact that two-thirds of the monthly expenses of SMEs is spent on going after debtors and trying to collect payments.
Data from BACs Payment Schemes Limited show that more than £8 billion is spent per year for this purpose, and around one-fifth of company directors end up having to take a salary cut to balance this cost.
SMEs are by definition small companies operating on very thin margins. The highest burden of non-payment such a company can take before collapsing would be around £50,000, while many companies cannot handle outstanding debt of more than £20,000. When the average rate of late payments is about £32,000, you can see why this is a huge problem and can have a severe impact on the economy.
But just because customers are accustomed to pay late, it does not mean that you cannot do something about it. Though this is a risk most business owners take and account for, it is important to have some rules in place to minimise late payments and to make sure that you know what steps to take if there is a payment problem.
There are laws to protect small businesses from going under because of delayed payments. It is important for you to inform yourself about these laws and seek ways to cut the impact of delayed payments. You can charge interest and claim debt recovery costs from the customer. All these laws are for your convenience and protection, so know them and use them to your best advantage.
Encourage your customers to set up direct debit with your company. This should prevent any problem of delayed payment from arising at all. Once the work is done, the payment will be made. Electronic payment also ensures that the funds are transferred right away and you will receive them far sooner.
You should also look to automating your processes. Job management software allows you to create your invoices from your job as soon as the job is completed, you can raise your invoices directly or export them to an accounting package. This helps make sure your invoices go out straight away and enables you to track them so you know when they have been paid or when they are being delayed.
If you are undertaking a task that would cost more than a nominal amount, insist on an advance. You could charge 25% or even 50% of the total amount. This should help in taking care of your immediate expenses, and you are also confident in the knowledge that at least part of the payment is already done.
Many companies do run on credit. But before giving credit to your customers, make sure you know how credit-worthy they are. Check out their credit reports from the Companies House or from a reference agency. Based on this, you can set a credit limit, both in amount and in time, for your customers. This will put you in control of outstanding payments and you can decide when to cut the credit.
It is important to show your customer that you take your payments seriously. Send the reminders just before the payment is due. In cases of delayed payment, do not hesitate to contact your customers and politely demand that your account be settled right away. You can remind them that you will charge interest on late payments. For these reminders, a phone call is always better than an email or a letter.
Keep on good terms with your customers. If your customer is a company, it is a good idea to network with people in the accounts department. Such networking will make sure that in times of difficulty, your payment will be the first to get cleared.
Try to offer incentives for those who pay on time without any fuss. If your customers know that prompt payment comes with its own rewards, they would be more inclined to make the payment right away. This kind of positive reinforcement works wonders and helps in solving the problem of delayed payments.
Find out more about Okappy job management software and how it can help ensure you get paid on time.
Job management and invoices is now handled by Okappy’s simple job sheet software. With Okappy you can easily connect to your external accounting packages such as Sage Line 50 and Xero.
Find out more about raising an invoice for a job and exporting jobs to Sage.
From within the Okappy invoices page, simply click on the Sage icon ( ![]() ) to export your invoices. The system will create a CSV file with the following Sage fields pre-populated:
) to export your invoices. The system will create a CSV file with the following Sage fields pre-populated:
| Column | Field | Details |
|---|---|---|
| A | Type | Sales invoice |
| B | Account Reference | This a reference you use to recognise a customer in Sage, i.e., MISC |
| C | Nominal AC Ref | The account you are posting the sales invoice to, typically in the range 4000 |
| D | Department | |
| E | Date | Tax date of the invoice |
| F | Reference | The AutoAlert invoice ID |
| G | Details | This picks up the Job ID (if available) and any description |
| H | Net Amount | Net amount of your invoice |
| I | Tax Code | The tax code, typically T1 for standard rate VAT |
| J | Tax Amount | The amount of VAT on your invoice |
The following fields are not exported from AutoAlert, but can be added to the spreadsheet if required before uploading to Sage.
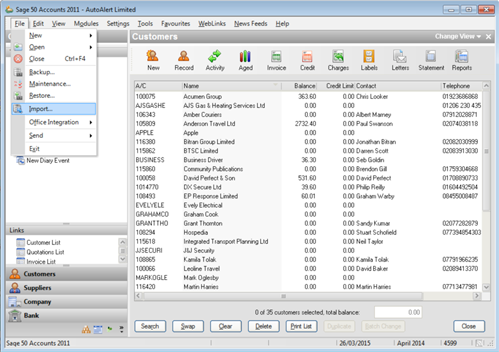
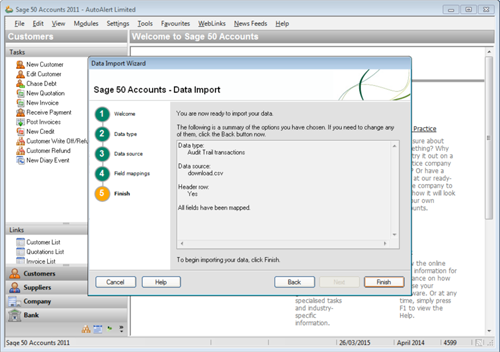
To import your file into Sage:
Open Sage, make sure all other Sage windows are closed and then go to File > Import
The Data Import Wizard will be shown.
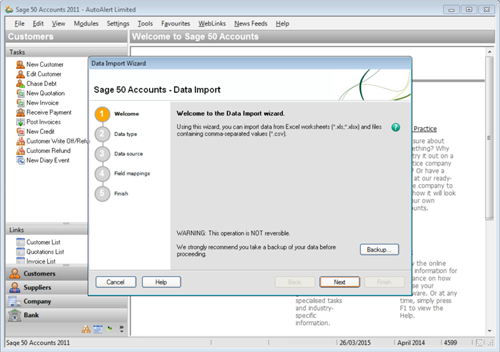
To be on the safe side it’s always worth backing up your data first by clicking on the Backup button.
I also find it easier if you have made an error with your import, or while testing as you can easily go back to the state of your accounts prior to the upload.
Click Next

Select the data type of Audit Trail transactions and click Next
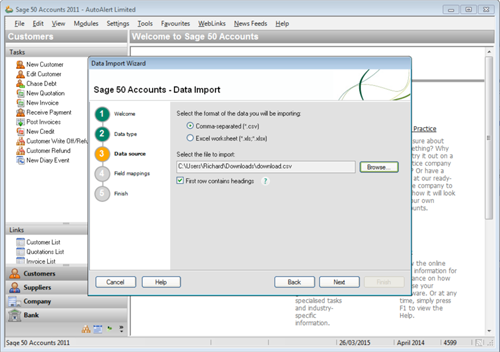
Note: Once you’ve selected the file you may need to again check the option for CSV as Sage sometimes defaults back to xlsx and then shows an error saying the file cannot be read. It also helps to click open rather than double clicking on the file name to select the file.
Click Next
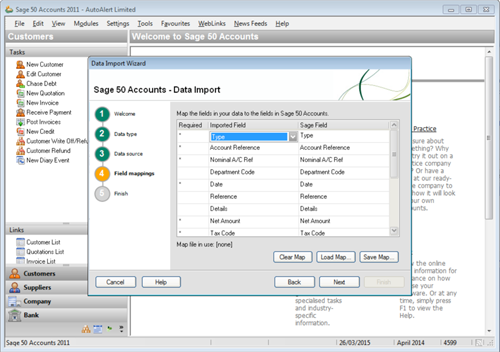
Choose Field mappings to match the column in the spreadsheet to your relevant Sage fields. The file is set out in the order required by Sage, so simply select A though I for each Sage field as shown below.
Click Next, then click Finish to import your data.
If all goes well, the following screen will show the invoices which have been imported.
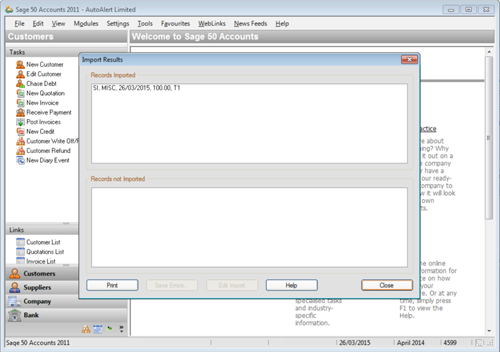
If there are errors with the import file, the errors will be shown.
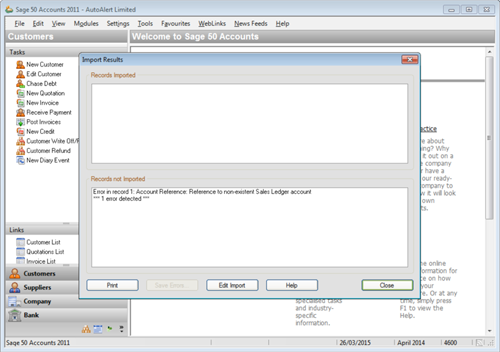
Typically errors could occur if the file has data for a field which is not matched in Sage, i.e., if you have a client identifier of MISA in AutoAlert but it is MISC in Sage or if a nominal code is used such as 4200 which is not present in your Sage chart of accounts.
Any errors can be corrected within the spreadsheet and then re-uploaded using the process above.
Note: Once your invoices have been exported from AutoAlert, they cannot be exported again so it is often worth keeping a copy of the export file.
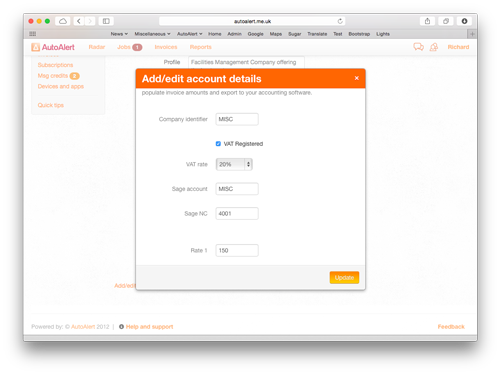
You can also check the account details from within AutoAlert to make sure the file is populated correctly the next time.
More information on Okappy Job Management.
The jobs screen shows the status of all of your jobs with various icons to denote whether a task has been completed or is running late.
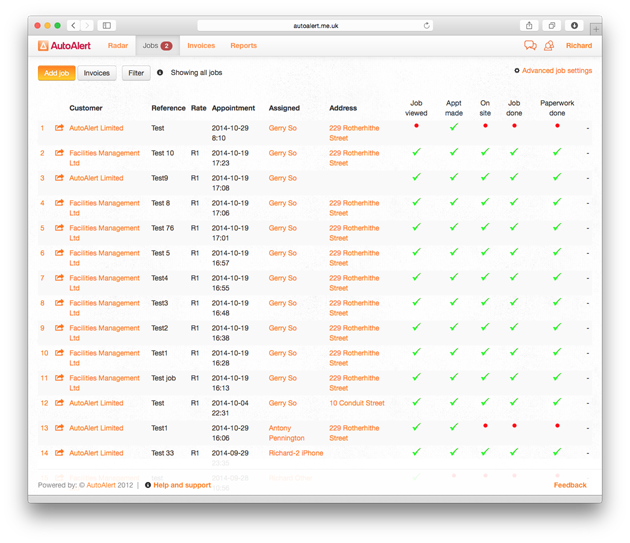
Following is what each icon denotes.
Note: You can change which columns are shown on your jobs screen by clicking Advanced Job Settings, clicking Change Page Layout and selecting which columns you want to show.
![]() SMS has been sent.
SMS has been sent.
![]() SMS has not been sent.
SMS has not been sent.
![]() Job has not been viewed.
Job has not been viewed.
![]() An hour has passed and the job has still not been viewed.
An hour has passed and the job has still not been viewed.
![]() Job has been viewed.
Job has been viewed.
![]() Appointment has not been made.
Appointment has not been made.
![]() Two hours have passed since the job was created and an appointment has not been made.
Two hours have passed since the job was created and an appointment has not been made.
![]() Appointment has been made.
Appointment has been made.
![]() If no one was available to make an appointment.
If no one was available to make an appointment.
![]() Its past the appointment date and time but the Engineer is not on site.
Its past the appointment date and time but the Engineer is not on site.
![]() Two hours have passed since the appointment date and time and the engineer is still not on site.
Two hours have passed since the appointment date and time and the engineer is still not on site.
![]() Engineer has visited site.
Engineer has visited site.
![]() Engineer has not completed job.
Engineer has not completed job.
![]() The job has not been completed within two hours.
The job has not been completed within two hours.
![]() The job has been completed.
The job has been completed.
![]() Paperwork has not been completed for the job.
Paperwork has not been completed for the job.
![]() The job paperwork has not been completed within 24 hours.
The job paperwork has not been completed within 24 hours.
![]() The job paperwork has been completed. If it for a customer, then the invoice is ready to be raised.
The job paperwork has been completed. If it for a customer, then the invoice is ready to be raised.
Find out more about AutoAlert Job Management.
A lot of customers use AutoAlert Job Management as it helps them cut the number of missed or disputed invoices.
Disputes often arose when a customer thought an engineer was on site for less time than quoted. As engineers would often fill out all their job sheets at the end of the week, it’s understandable that on some occasions the exact times they entered or left site could be forgotten.
AutoAlert job management not only makes it easier for your engineers to update their jobs on site with the click of a button, you can also view an audit trail showing the exact time and location when a job was updated.
Following is a quick guide of how to enable and view audit trails.
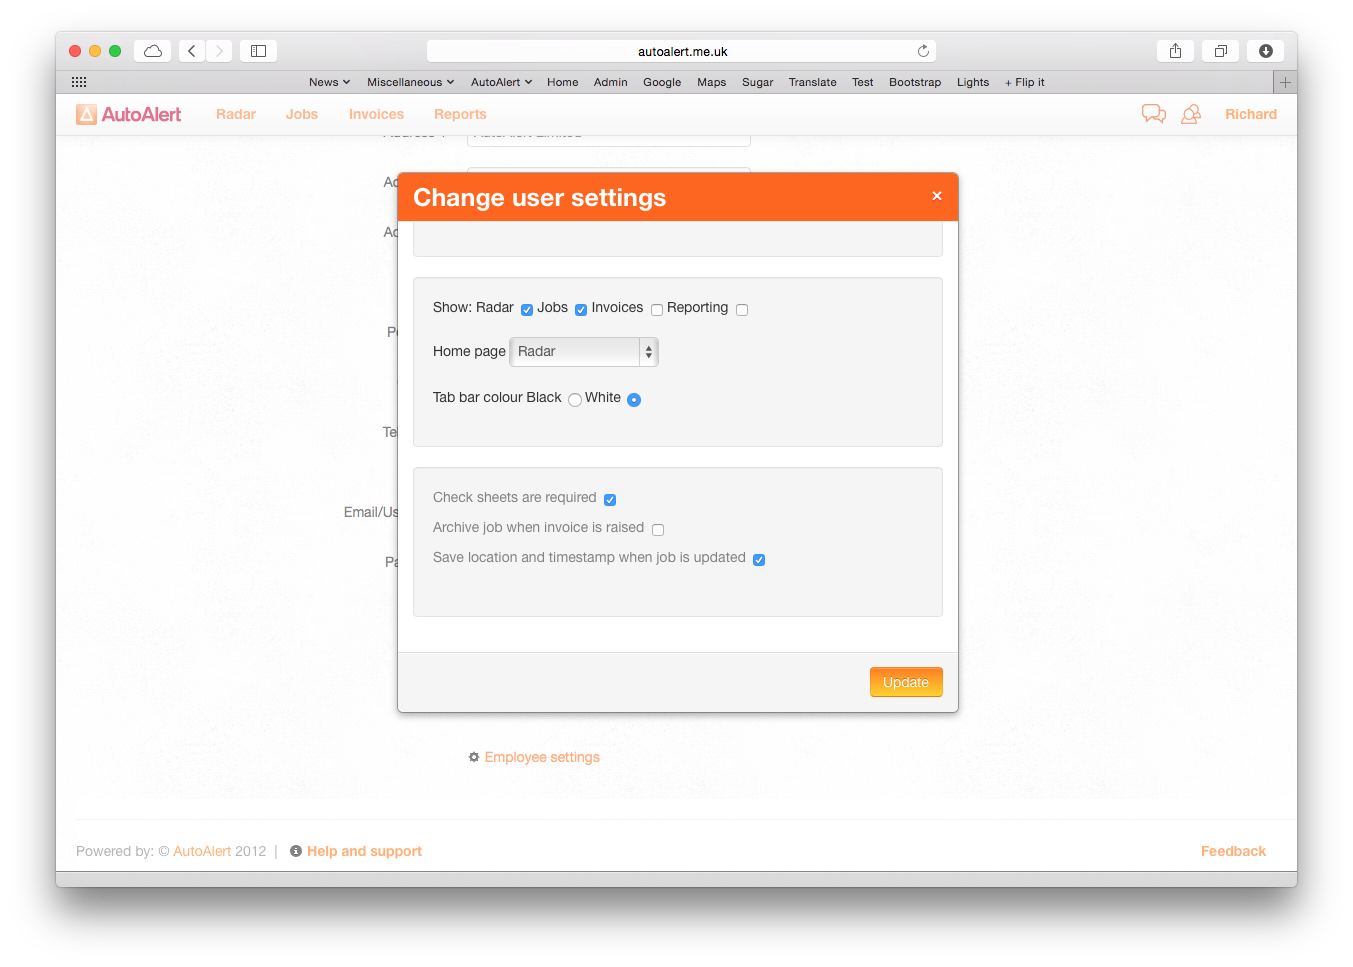
To save the location and timestamp for your engineers when they update a job, click on the connections icon (![]() ) at the top right of the screen. Then
) at the top right of the screen. Then
To view the time and locations for each update to your job. Simply

The following window will be shown displaying each action for the job and the time and location the action was performed.
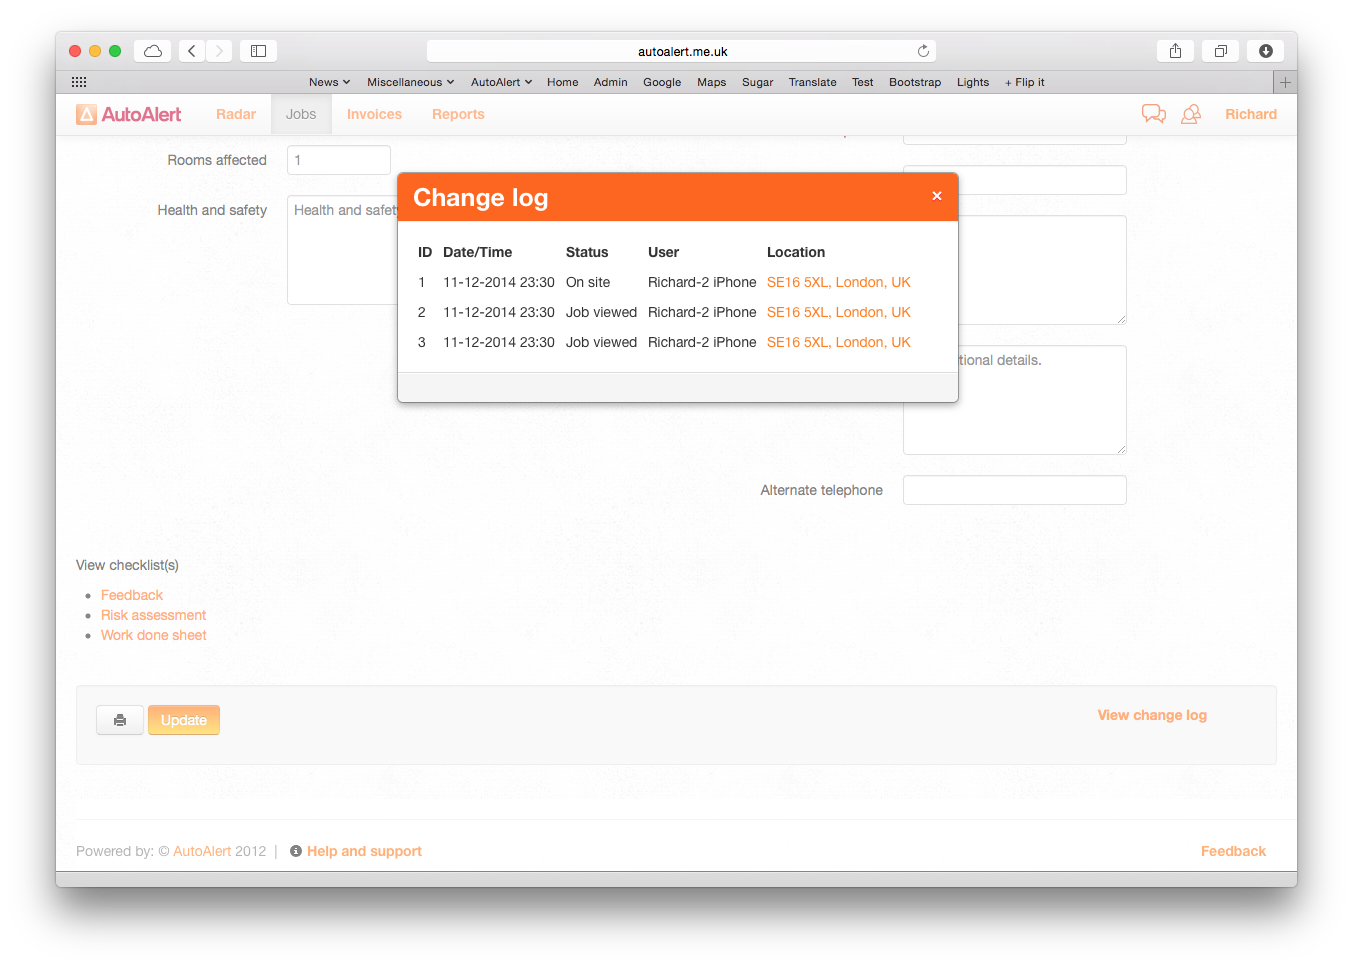
You can click on the location to view it in Google Maps.
With an audit trail for each job, you can have more confidence that the times you have quoted on your invoices are correct. There’s no more risk that the time has been overestimated because your engineer hasn’t filled in their job sheet until hours later when they’re at home.
Using AutoAlert’s iPhone or Smartphone app is also easier for your engineers. With one click to update a job there’s less administration for them and no reason to find downtime in their week to update all their job sheets.
With AutoAlert GPS Tracking, you can also see various reports such as the stationary times report and driving times report which show the start and stop time and location for your vehicles and engineers.
You can also set up virtual areas and get alerts around your customers’ location and then get alerts when one of your engineers enters or leaves that area. This is also useful to help with your duty of care towards your remote workers.
For more information see:
Or find out about AutoAlert’s job management software and how it can cut your paperwork.
With AutoAlert, you can easily raise invoices for your jobs, send them to your customers and/or export your invoices to Sage.
To export your invoices to Sage, first raise invoices for your customers jobs or create ad-hoc invoices for your customers.
Jobs screen
To view all the invoices you have raised, click the invoices button from your job screen or click the invoices option on your tab bar, if enabled.
Note: To enable the invoices option in your tab bar, click on your name, click settings and then ensure the invoices option is ticked.
Invoices screen
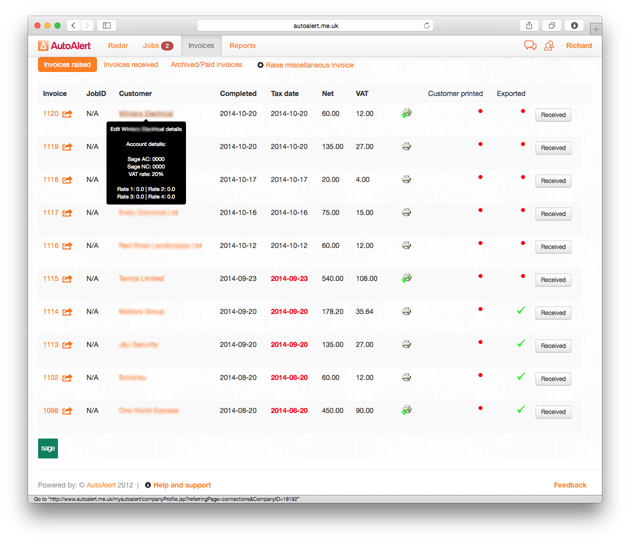
The invoices screen shows all the invoices you have raised.
Clicking on the more icon () allows you to
If the invoice has been raised from a job, you can click on the job number to view the job details.
Hovering over your customers name will display the Sage nominal codes which you have entered for that customer. Click the customers name to add or edit your customers nominal codes.
You can also see when the job was completed and the tax date of when the invoice was raised plus the net amount of the invoice and the VAT.
The next columns show whether you have printed the invoice.
You can see whether your customer has viewed and printed the invoice (this requires your customer to have authorised an account with AutoAlert and logged in. See connecting to your customer for more information about connecting to your customers and subcontractors).
The exported column shows whether you have exported the invoice to Sage.
The final column shows whether you have received payment for the invoice. Clicking the receive button updates the invoices to show that payment has been received. The button changes to a green tick (![]() ).
).
To export your invoices to Sage, simply click the Sage icon (![]() ) at the bottom of the page.
) at the bottom of the page.
This will create a CSV file in the format required for Sage. It will include all the Sage nominal codes you have saved for each customer. You can then import the invoices directly into Sage using the Sage import process.
Once the invoice has been exported, it will show as ticked in the exported column and cannot be re-exported.
Once payment for your invoice has been recognised and the invoice has been exported then it will automaticaly be archived from the main invoice screen.
To view your archived invoices, click Archived/Paid invoices from the top of invoices screen.
Fore more information see
With AutoAlert, you can easily raise invoices from your jobs or create a miscellaneous invoice. But what if you’ve made a mistake on your invoice and need to either cancel it completely or amend the amount.
To cancel or amend an invoice, the easiest way is to select your existing invoice and then click copy invoice.

This will create a new miscellaneous invoice with the same details. You can then either change the amount to negative to offset your original invoice or add a different amount to either reduce or increase your existing invoice.
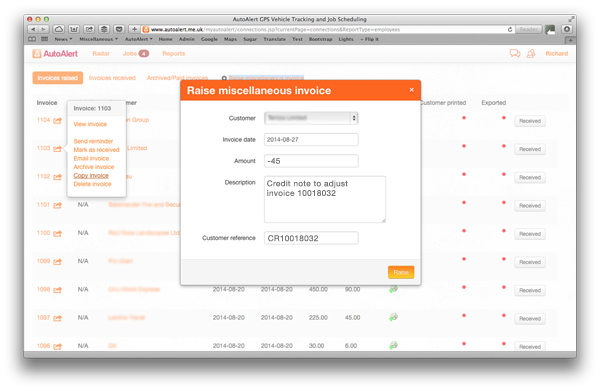
You can also change any of the details in the description to make it clear that this is a credit note.
Find out more information about AutoAlert Jobs Management and how it can be benefit your business.
With AutoAlert, your invoice is immediately available to your customer as soon as you raise it. No more invoices lost in the post, no more delayed payments and no more unhappy Finance Directors!
However, sometimes you may also need to send the invoice by email. This can also be done easily from your desktop.
Following is our quick start guide of how to email an invoice to your customer or another person.
To email an invoice, simply go to your invoices page by clicking on Invoices in the tab bar (if you have the option enabled) or click Jobs to go to your jobs page. Then click the Invoices button.
Select the invoice that you want to email and click the more icon ().
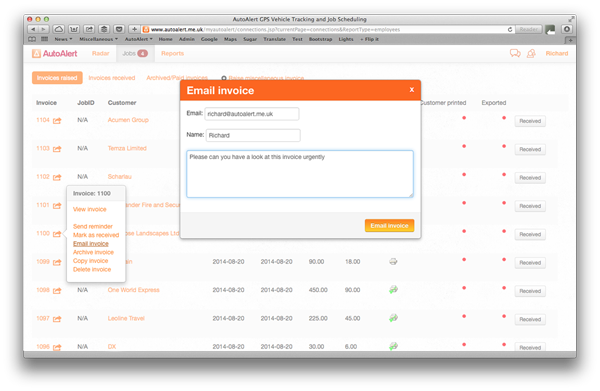
A pop up box will be displayed.
They will get an email with a link to the invoice which they can click on. If they are logged into AutoAlert, then they can view their other invoices and pay the invoice straight away.
Find out more about AutoAlert Job Management.
With AutoAlert Job Management, you can raise an invoice for your customer once you have completed one of their jobs. You can also raise ad hoc invoices for a customer at any time.
To raise a miscellaneous invoice for a customer,
1) Click invoices if you have invoices enabled in your tab bar, or click Jobs to go to your jobs page and then press the Invoices button.
Ensure that the invoices raised option is selected.
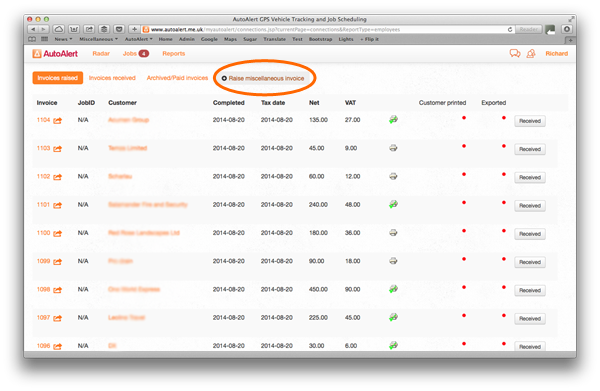
2) Click Raise miscellaneous invoice
The raise miscellaneous invoice dialog box will be shown.
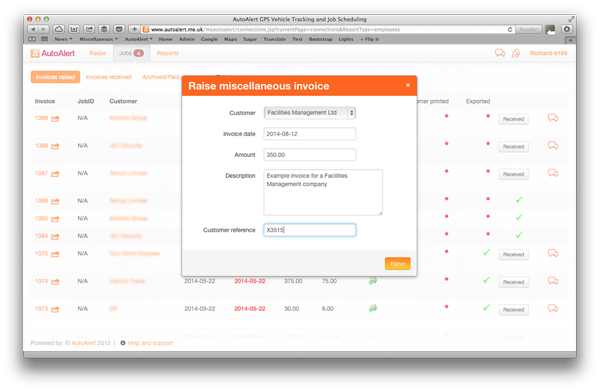
3) Enter the details you want to appear on the invoice and click Raise.
The invoice will be immediately available in your customer’s account. You can also email them a copy of the invoice or send a text message if you are concerned that the invoice may become overdue.
If you have invoices created already, then you can quickly copy an existing invoice.
Simply click the more icon () and then select Copy invoice.
The existing invoice details will be shown but with a new tax date.
You can then amend any of the details or raise it as is by clicking the Raise button.
Find out more about AutoAlert Job Management or check out our support centre for information on exporting your invoices to Sage.


 0207 099 5698